I like to use Ilford’s FP 4+ (ISO 125) and HP 5+ (ISO 400) black and white films. In order to keep cost down, I buy 100 foot rolls and load them into reusable cassettes with either 24 or 36 exposures. Most commercial cassette film comes with a code called DX (Digital indeX) that identifies the ISO (light sensitivity) of the film, among other kinds of information. Of course there is no such coding on reloadable cassettes that are available for respooling film. The absence of ISO coding is not a problem for cassettes used in cameras whose ISO can be set manually. However, there are some totally automatic film cameras, such as the Olympus Stylus that I like to shoot, that will not work with non-DX coded film.

Figure 1: Olympus Stylus with DX auto sensing code
So I searched the web for labels that I could purchase to stick on my hand-loaded cassettes, but did not find any. Next I searched for do-it-yourself methods and found quite a few. But most of the methods involved either altering existing cassettes by scratching off paint to reveal the metallic conductive cassette casing in the proper spots or covering them up, or fashioning labels with cutouts corresponding to the appropriate codes and taping aluminum foil to the labels to expose the code. This latter method was attractive to me initially, but the stumbling block was carefully cutting out the square cutouts with a single edge razor blade or very sharp knife. This was painfully slow for me.
So I thought about an alternative way of making the cutouts. Then it came to me – what about using a hole punch to make the cutouts. Would a round hole work instead of a square opening? After looking at the contacts in the camera where the cassette is loaded I saw that they actually would only touch a small spot on the cassette and they had sufficient separation from one another. It seemed likely that a round design would work as well as a square one.
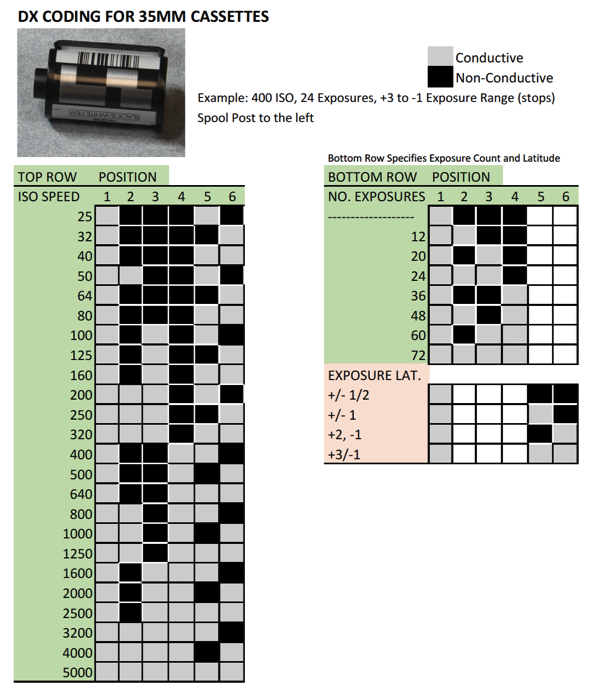
The next challenge was to find out what the codes mean. I used the information from this site and created a modified version of the code diagram that seemed easier for me to interpret. There are two rows of six rectangular blocks. Viewing the cassette with the spool post to the left, the first (top) row specifies the film speed (ISO), while the second identifies the film length and exposure tolerance. The silver colored areas are the conductive rectangles while the black are the non-conductive areas.
I used the Avery Design and Print application together with Template 5160 and White Easy Peel Address Labels 5160 to design a template for DX labels. Using this template and the DX coding reference sheet I can code any DX label that I want. You can get Avery’s software for PC or Mac here. If for some reason the application does not work satisfactorily, you can use the online version available at the same site.
You can download the template I created here, and a copy of the codes here. The following video shows how I use the template and the software to create custom DX Coded labels.
The next step is to fabricate the conductive and non-conductive areas of the label for the desired code. To do this you need the following materials/supplies:
Double-sided Scotch tape Scissors Single-sided Scotch tape ¼-inch paper-hole punch
Film cassette to code Previously coded film Aluminum foil DX code printed on Avery Easy Peel
cassette labels

- Take one of the labels and the hole punch and center the punch in each white square and punch a hole. Try to be as accurate as you can but not to the extreme.
- Cut a piece of aluminum foil about the size of the label.
- Carefully peel off the label from the sheet, exposing the sticky back side.
- Place the label over the cut piece of aluminum foil making sure that all the punched holes are covered. Press down on the label evenly to affix the label to the aluminum foil.
- Trim aluminum foil as need
- Trim the left and right sides of the label using the left and right sides of the rectangular box as guides. Do not trim the top or the bottom.
- Measure out a piece of double sided Scotch tape at least as long as the width of the label and stick it to the aluminum foil side of the label. You may need more than one strip to cover the entire back of the label depending on the width of your double-stick tape.
- Trim the double stick tape to match the edges of the label
- Using an existing cassette that has DX coding line up the naked cassette side by side with both spool posts to the left. Position the label on the cassette so that it duplicates the position on the DX-coded cassette. (The actual coding does not matter; we are only interested in aligning the label on the cassette in the correct place.
- Once aligned firmly press the label onto the cassette.
You are done.
Optionally, I like to take a small piece of single-sided Scotch tape and tape the top and bottom of the label to the cassette, taking care not to cover up areas where there is aluminum foil.
Here is a link to a video that shows the process.
Obviously, this method would be impractical if you needed to label hundreds of cassettes, but I found it easy and quick for the small number of cassettes that I re-spool at any given time. Also I like the ability to recode existing cassettes to shoot film at speeds other than box speed in cameras where you cannot set ISO manually.
Connect
A retired forester, Custer, Wisconsin-based Robert Rogers likes to shoot landscapes, flora and for charitable organizations. His film work goes under the name Wyndehill Studio.