DR5 Film Lab's DR5 Black and White Slide Film Process
There is something magic about the contrast and the brilliance of slide film. Besides looking awesome on a light table, with slide film your process is more complete with the click of the shutter. Negatives seem to be much more open to interpretation in terms of color and contrast which leads to more work at the scanning table and more time behind the computer. Avoiding the computer is one reason so many photographers are shooting film and you are about to see one more reason to spend less time behind your screen. DR5 Lab's DR5 Black and White Transparency Processing! What is it? It is black and white slides; positive black and white images developed from standard, negative, black and white films!
I have shot as much (color) slide film as any other type so I was excited give the DR5 B&W process a run. All images were taken with my mechanical rangefinder, Fuji GW690III. I shot two different types of film using two vastly different lighting styles. The DR5 process works with most black and white films but not all so do check their website before committing to the process. In addition, they have a recommended ISO for each film that may differ from box speed. My test included Ilford HP5 Plus 400 (shot at the recommended ISO 1,000), and Ilford Delta 400 (shot at the recommended ISO 200) . DR5 Lab highly recommends using Ilford HP5 Plus 400 for this process but they recommend not using Ilford Delta 400. Fuji Acros is not compatible with the DR5 process.

Ilford HP5 Plus 400 (ahem, I mean iso 1,000)
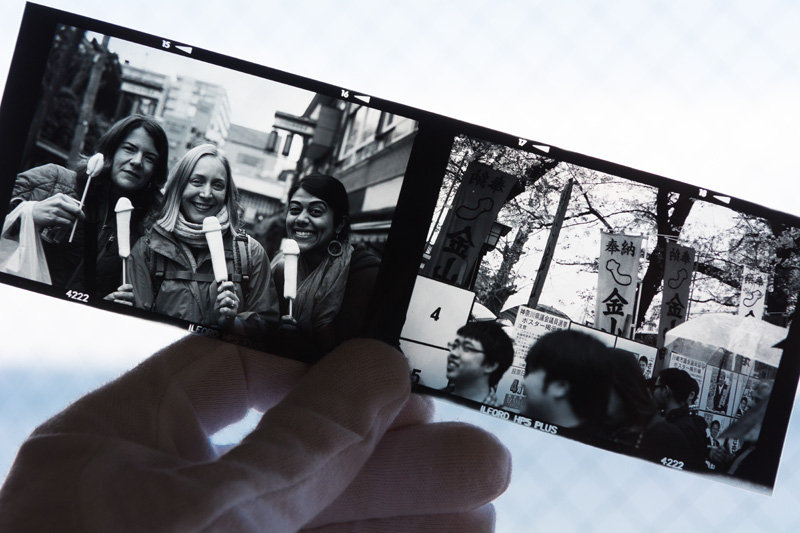
With the Ilford HP5 Plus I decided to do some natural light photography. The subject was the Kanamara Matsuri in Kawasaki, Japan. This festival is known to foreigners as the "Penis Festival." Legend has it that a woman had something of a demon in her, which left two men short a penis. The remedy to this problem was a steel phallus. Once the steel phallus was employed, the teeth of the demon were broken and the woman was cured. This year the festival took place on a rainy day with heavy overcast. I set the exposure using an incident light meter and hedged my bets toward a brighter image. One image was of a fire inside a dark building and that image was spot-metered.

Being able to shoot at ISO 1,000 during a crowded festival was a true gift. As the parade went by I was getting bumped and pushed as I tried to focus the rangefinder, compose, and shoot a decent frame. The speed really helped to eliminate motion blur while maintaining a decent depth of field. Without the high speed I would have just passed on taking the man with fire image altogether. Looking at the results of the roll, there were no surprises with the exposure. The slides have a bright feel but almost the entire density of the film was used from transparent to deep black. Of particular note is the apparent lack of film grain that I would just not expect from any film shot at such a high ISO. If you showed me the scan and had me take a guess I would tell you that it was probably ISO 100 film shot at box speed.

Ilford Delta 400 (shot at 200)
I was actually warned by DR5 Lab that other films besides Delta 400 produce better results. I wanted to shoot it anyway because I have experience with Delta 400 and I had some laying around. This exemplifies one cool thing about DR5 Lab. If you have a specific need, they will send you in the right direction. I was in fact given a list of films that are preferred for this specific type of moody lighting but I ignored it. For this article I chose to pick one of the most highly recommended films (HP5) and also one not so highly recommended (Delta 400) because some people, like myself, have a film that they just really like and may not want to switch from.

With the Ilford Delta 400 I wanted to do a photoshoot that had the concept of 'slide projector'. I created a makeshift slide projector with a camera lens and a speedlight. I projected some 35mm color slide film I shot for a fashion project onto my wall. Can't do that with a negative! I then used studio lighting to create a dark film-noir kind of look. I used a grid, a snoot, and even a black keyboard to block and shape the light. Unsurprisingly, many images turned out a bit on the dark side. Because I am using the slides for scanning rather than to project them, the darkness was not a huge problem. I brightened up the underexposed images during scanning. That said, the DR5 processed Delta 400 does not appear to hold the rich shadow detail that the DR5 processed HP5 does have. The grain of the Delta 400 appears to be on par with the HP5.

Final Thoughts
The density range of positive film works a bit different than that of negative film. The original idea was to use it in a projector so whites have to be nearly transparent and blacks have to be very dark. This was in fact the case with my DR5 B&W processed film. This does not leave a lot of room for error when shooting so try to keep the exposure within one stop of ideal. Negative film on the other hand compresses a medium-contrast scene to well within the density range of the film, leaving a range of greys on the negative, as well as more tolerance for exposure error. The contrast of the negative is brought back out during the printing process. What this means to you are the following:
- You must shoot film for the DR5 process like slide film. I do not believe this process will tolerate wild over-exposures like traditional negative film will.
- Scanning is easy because every image will have similar black and white points if you shot a series of well-exposed images.
- Your down-selection process has been simplified because what you see is what you get.
- Grain is minimized, read on.
The grain of the DR5 HP5 Plus is more on par with an ISO 100 film than an ISO 1,000 film. The Delta 400 grain is similarly subtle but remember that I shot that at 200, not 1,000. I was in such disbelief that I re-scanned one image at a higher resolution to compare with some conventionally processed images that I have. What I noticed is that the while the grains are about the same size as conventionally processed film, there is much less tonal difference between them with the DR5 process than with traditional black and white negative processing. What this means is that the grains are less noticeable because they are more homogeneous. I find the same to be true regarding the difference between color slide and color negative films. The grain on slide film appears to me as tiny bubbles. On negative film I see them as tiny crystals that draw much more attention to themselves. Perhaps the reason is the contrast added during the negative scanning or printing process. Increasing the contrast will increase the contrast of the film grains, making them stand out more. This step is simply not done to an equivalent extreme during the slide scanning process.
Besides low grain, the transparencies I received from DR5 Lab exhibit very low dust. I have been testing different B&W processing labs recently and all of them seem to deliver negatives with dust stuck to them. I spend hours in Photoshop removing the spots from my very favorite images. With the scans from the DR5 transparencies this is not an issue at all. Again, less time behind the computer. I am not sure if DR5 Lab is just very clean or there is something inherent in the negative inversion process that makes the dust on negatives appear worse. Either way I am happy to literally scan the images and be done with them right then and there. If I do spend time in Photoshop it is to enhance the image with contrast, dodging, and burning. It's surely a much more enjoyable process enhancing photographs than spending hours fixing dust that should not have been there in the first place. For this entire article I only photoshopped out about 6 spots of dust.
Will I continue to use the DR5 B&W Slide process? Definitely! I will use it for projects for which I know I can control the contrast range as I do when I shoot color slide film. For other projects where I have less control over the lighting such as my night cityscapes I will need to do some more testing before committing to a change in my current process. Perhaps this new-to-me process will inspire a whole new series of black and white images well suited to it's low grain, high-contrast, and with HP5, ultra high-speed.

Update!
Please note that as of May 15th, 2015 the DR5 Lab will be moving to a new location. The last day for processing film at the current Denver location will be May 20th, so hurry!!
Connect
Mark Schlocker is a San Francisco Bay Area, California based photographer. Follow him on Facebook and see more of his work on his website.
All images Copyright 2015, Mark Schlocker